| Creating Slide Show |
|
Slide Show projects
MySlideShow saves the slide shows that you create in files called slide show projects. A slide show project is a text file (in XML format) containing links (paths) to individual slides, and the various slide and project settings. Slide show projects have ".ssx" file extension. Projects created by the previous versions (v1.x, 2.x) of the program have ".ss" extension.
Standard actions (New, Open, Save and Save As) are available through the File drop down menu or the toolbar buttons. When the program starts up it will open a new slide show file called "UNNAMED.SS". You can see the name and the slide number in the program title. The program will ask you to supply a name when you save the data.MySlideShow has an indicator that shows if you've modified your slide show data. The hyphen mark ("-") between the "MySlideShow" and the current slide show file name in the program title is changed to an asterisk ("*"). For example, it happens if you've added new slides, changed its parameters or set the Slide Show Settings or Background Sound. When you close the program has unsaved data or open a new project MySlideShow will remind you of that.
Adding new slides
To add new slides to the current slide show project select one or more image files in the File List and click on the Add Selected button at the right. Also you can add a slide by double-clicking on a file or drag one or several files from the File List to the Thumbnails view of the Slide List. To add all image files from the current folder, click on the Add All button.
![]() Notes
Notes
- To select several files in the File List click on them holding CTRL or SHIFT. The same technique is used in Windows Explorer and is described below for the Slide List.
- To add slides to the current position in the slide list, click on the Add Selected or Add All button holding CTRL.
Working with slides
You can control slides in the Slide List by the SlideShow menu and the slide show controls - the group of buttons at the right of the Slide List.
Selecting several slides
If you've already added some slides or loaded a previously saved slide show you can select several slides in the Slide List.
![]() To select multiple slides click on the first one and,
while holding down CTRL, click on each of the others.
To select multiple slides click on the first one and,
while holding down CTRL, click on each of the others.
![]() To select continuous block of slides click on the first slide, then, holding SHIFT, click on the
last desired slide in the list.
To select continuous block of slides click on the first slide, then, holding SHIFT, click on the
last desired slide in the list.
![]() To select all slides in the list press CTRL+A or choose Select All from the SlideShow menu.
To select all slides in the list press CTRL+A or choose Select All from the SlideShow menu.
Sorting and removing slides
To change the place of individual slides in the Slide List you can use the arrow buttons. Select a slide, then move it up or down clicking on the corresponding button. Another way to change the position of one or several slides is to drag them to a new place in the list with the mouse.
![]() Note
Note
- To remove the selected slides, select one or several slides and click on the Remove button or press DEL. Hold SHIFT to remove slides without the confirmation.
Slide context menu
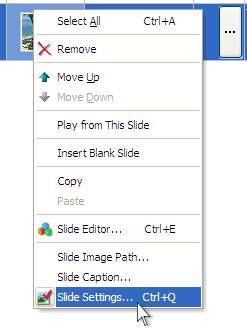
You can manipulate slides by the context menu. Right-click on a slide to show the menu. It allows you to remove, change slide
position and select all slides. The Slide Settings menu item opens a dialog
containing individual slide settings. The Slide Image menu allows you to
change or rename the image file of the selected slide. The Slide Caption
menu can help you to change the caption for the selected slides. For example,
you can type in the Slide Information insertions.
If you select a group of slides, the menu displays the Slide Folder
item instead of Slide Image. The item allows you to change the folder
(location) for the selected group. This useful if you're moving your slide
images to another folder.
Actions
From the SlideShow menu you can run the following actions:
![]() Click Shuffle to change order of your slide items
randomly.
Click Shuffle to change order of your slide items
randomly.
![]() Click Remove Duplicates to find and delete
slides that have links to the same image files.
Click Remove Duplicates to find and delete
slides that have links to the same image files.
![]() Click
Sort By
| File Name or File Date to sort the slides in the slide list. To
change the slide order, select the Sort Ascending or Sort Descending menu item.
The Sort By | Meta Info menu allows you to sort slides by the EXIF and
IPTC meta tag information. Use the Tools | EXIF Inspector plug-in to find
out all EXIF and IPTC fields placed in your JPEG image files. For example, to
sort your slides by the "User Comment" EXIF field, enter {EXIF: User Comment}.
Click
Sort By
| File Name or File Date to sort the slides in the slide list. To
change the slide order, select the Sort Ascending or Sort Descending menu item.
The Sort By | Meta Info menu allows you to sort slides by the EXIF and
IPTC meta tag information. Use the Tools | EXIF Inspector plug-in to find
out all EXIF and IPTC fields placed in your JPEG image files. For example, to
sort your slides by the "User Comment" EXIF field, enter {EXIF: User Comment}.