|
| |
-
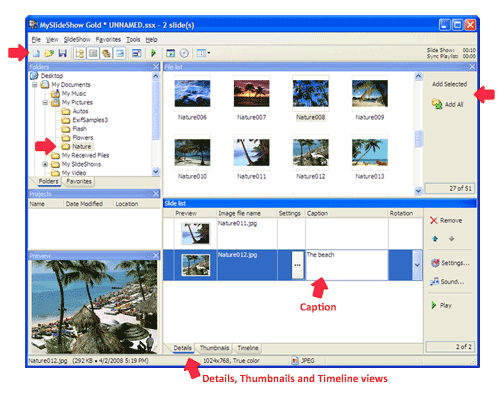
To create a new slide show project, click on the New button or select
the File | New menu. Select a folder with pictures in the Folder Tree.
For example, it may be your My Documents\My Pictures folder. The File List will
display the picture files.
-
To add all pictures to the project, click Add All. To add a group of
pictures, select several icons and click Add Selected. You can
add a picture from the File List to the end of the Slide List by
double-clicking.
-
To add a caption for a slide, double-click on the corresponding Caption field
in the Slide List or select it, click once or press F2. Enter your caption and then press CTRL+ENTER.
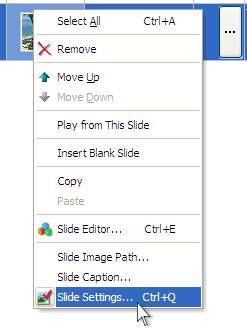
Another way to enter a caption is to right-click on a slide and select the Slide
Caption menu item.
-
To save the project, click Save or select the File | Save menu.
Enter a name for the new project.
-
To run the slide show, click Play or press CTRL+P.
-
To open the Slide Settings window, select the slide, then click the
button in the Settings column (in the Details view) or press
CTRL+Q or right-click on the slide and select the Slide Settings menu
item.
-
To change the duration of a slide, select the Slide tab in the Slide
Settings window,
and then change the Advance > Automatically after value.
-
To change the transition effect of a slide, select the Transition tab
in the Slide Settings window, and
select one of the Transition options.
-
To select several slides in the Slide List, click on them holding CTRL. To
select a sequential group of slides, click on the first slide in the group and
then on the last slide holding SHIFT.
-
To change the Slide Settings for a group of slides, select them in the Slide
List and then use the Slide Settings window. The changed options will be
marked by a frame. Only these options will be changed when you click OK.
-
To add music, click Sound, then click Add and select one or more
music files (.mp3, .wma).
|
Main screen
|
|
Slide right-click popup menu
|
|